Have you encountered iTunes error 54 on your computer? Don’t be disappointed if you do. “This guide will provide all possible solutions to fix it easily.” ” Following the recent iTunes upgrade on my Windows 10 computer, iTunes consistently reports an error that says, “The iPhone will not sync. An unknown error (-54) occurred “while using iTunes to sync my iPhone. How can it be fixed?”
When you want to sync your iPhone, iPad, or iPod touch with iTunes, you may see the following message: “The [device name] iPhone cannot be synced. An unknown error (-54) occurred.” This problem is usually resolved by restarting your iPhone and computer. If a restart doesn’t work, you’ll need to try some other solutions in this guide. If you’re curious about iTunes error 54, you can learn more about it here.
What Is iTunes Error 54?
iTunes error 54 is a permission error that frequently occurs when you attempt to sync files with a locked computer or when your computer is not authorized to access iTunes files or contents. Other unknown iTunes errors, such as error 0xE8000015, error 3194, and error 3150, are also prevalent. This guide will primarily cover iTunes error 54 and troubleshooting tips.
7 Ways to Resolve iTunes Error 54
Try the solutions listed below to resolve iTunes error 54. If no standard solutions work, you can use an iTunes alternative to sync your iPhone data or manage your files.
1. Combine the Media Files in the iTunes Library
The iTunes media library contains all the music, movies, and videos you bought or imported from your device, which may be stored in multiple locations. To reduce errors, combine all media contents into a single folder. Here’s how it’s done:
- Open iTunes on your PC or Mac.
- Select “File” > “Library” > “Consolidate Files.”
- Click “OK.”
2. Only sync a small amount of data at a time.
This error also occurs when you synchronize too much content at once, so you should only sync a small amount of content at a time and gradually increase the amount until the error appears again. You can then identify the file that is causing the issue.
3. Examine the Security/Third-Party Software
Some third-party or security software can interfere with the sync process when you use iTunes. Try closing the security software or changing its settings to resolve the issue.
4. Delete and re-download/re-import data
Furthermore, error 54 is likely to occur with iTunes Store. If this is the cause of iTunes error 54, you can try uninstalling and then reinstalling the content. In addition, you can remove and re-import files you import from other sources.
5. Removed PDF Files Before Syncing with iTunes
This error may also appear when you try to sync with Apple Books or transfer iTunes purchases from your device to your computer. Because iTunes cannot read PDFs, you should share your PDFs from iPhone/iPad to computer, then delete them before using iTunes to sync.
6. Modify iTunes Permissions
Because error 54 is a permissions issue, you can resolve it by changing the permissions of your iTunes folder or the original files/folders. Here’s how it’s done:
- Open Windows Explorer.
- Navigate to the “Music” folder.
- Right-click the “iTunes” folder.
- Select Properties.
- Uncheck “Read Only.”
7. Sync iPhone Data to Computer Using an Alternative to iTunes
As we all know, when you sync your iDevice to the computer, iTunes error 54 can occur. It is a widespread mistake. It takes a lot of time and effort to fix once it happens. You can quickly solve this problem if you are fortunate enough to find a workable solution. However, if no one of the solutions works for you, you may have to use the iTunes alternative to manage your files.
Numerous iTunes alternatives are available on the market; however, we will focus on one of the best ones for the iPhone – EaseUS MobiMover. EaseUS MobiMover, as a professional iPhone data transfer tool, has many features that iTunes does not, such as:
- Data can be moved from an iPhone to a computer or vice versa.
- Transfer data between two iPhones
- Backup and restore iPhone data.
- On your iPhone, manage WhatsApp data.
- Videos from Twitch, Twitter, Facebook, and other websites can be downloaded.
You can sync iPhone data to a computer by doing the following:
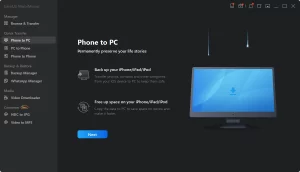
Step 1: Use a USB cable to link your iPhone or iPad to your computer. If a pop-up window appears, tap “Trust This Computer.” Next, start EaseUS MobiMover on your computer and choose “Phone to PC” to sync iDevice data to the computer. To proceed, click “Next.”

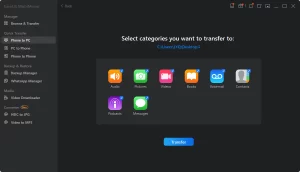
Step 2: Now that MobiMover has loaded all of your data onto your iDevice, you can begin the transfer. Before that, specify the location of the iPhone/synced iPad’s files. MobiMover will otherwise export the data to the desktop. Next, select the data categories you want to transfer and click “Transfer.”

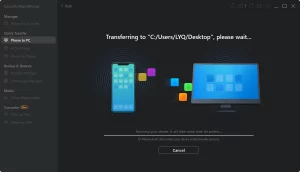
Step 3: Be patient while all selected files sync from your iDevice to your computer. Please keep your device connected while transferring. Then, you can browse, edit, and relocate the newly added content.

Additional Solutions to iTunes Error 54
I believe the methods described above are sufficient to correct the sync error. You can, however, take some additional steps. Here they are:
– Turn off antivirus or firewall software because these can sometimes exacerbate the problem. Then, see if it corrects the error.
– Think about performing a clean boot. Then try to sync once more. It will help you determine whether or not third-party services were causing a problem.
– Delete the contents and re-download/import them.
– You can also remove PDF files from the sync process.
1. Launch EaseUS MobiSaver.
To begin, download EaseUS MobiSaver > Connect your iPad or iPhone to your computer > Launch EaseUS MobiSaver > Choose “Recover from an iTunes Backup” > Choose an iTunes backup.
Step 2: Enable iTunes
If this iTunes backup is password-protected, you must enter the password to unlock it. After you’ve entered your password, click the “Continue” button. EaseUS MobiSaver will scan your backup file for lost data automatically.
Step 3: Preview and Recover iTunes Data
Preview the detailed data of your lost photos/videos, contacts/messages, notes, and SNS data after scanning. Then, select the file and press the “Recover” button to save it to your computer.
Conclusion:
That concludes our discussion of how to resolve iTunes error 54. If you encounter this error, don’t be afraid to use the solutions provided in this guide to resolve it quickly. Also, don’t be concerned about data loss while attempting to resolve this issue. The extra tip can assist you in recovering deleted or lost data from your iPhone.
ALSO SEE:Fix iPhone Error 4013


