According to a software specialist, the 0xc1900101 Error is generated by the BSOD and is so annoying and unpleasant. This post will teach you some practical methods for correcting this issue. Unfortunately, when it comes to installing or updating Windows 10, there are numerous challenges that you may encounter.
In most circumstances, the system will produce an error message that will assist you in determining the problem. This article may be helpful while updating and installing the Windows 10 operating system. The error message that appears when installing Windows 10 is – Sorry for the inconvenience. We were unable to complete the Windows 10 upgrade. We’ve installed the older version of Windows 10 on this computer.
Here is a list of points of Windows 10 Installation Errors that typically occur throughout the installation process.
- 0xC1900101 – 0x3000D
- 0xC1900101 – 0x20004
- 0xC1900101 – 0x30018
- 0xC1900101 – 0x4000D
- 0xC1900101 – 0x2000c
- 0xC1900101 – 0x20017
- 0xC1900101 – 0x40017
How to Resolve the Windows 10 Installation Error 0xC1900101
Follow these procedures to resolve Windows 10 Installation Error 0xC1900101:
1: Turn off any external devices
The issue with Windows 10 Installation Error 0xC1900101 may develop due to several peripheral devices connected to your computer. Examples include microphones, digital cameras, speakers, printers, and many more. When the operating system attempts to find drivers for each of them, it becomes stuck. External device drivers, on the other hand, may not always be compatible with the operating system.
As a result, to resolve this issue, we recommend that you unplug all non-essential external devices. After that, restart the computer and see if the error 0xC1900101 persists. If that doesn’t work, continue to the following workaround.
2: Make space on your hard drive to fix the 0xC1900101 Error
While updating your system, you may encounter the Windows 10 Installation Error 0xC1900101 problem. It is one of the most prevalent issues reported by Windows users. You must have at least 16 GB of free space on your hard disc to upgrade to a 32-bit operating system. In contrast, upgrading a 64-bit operating system takes a minimum of 20 GB of space.
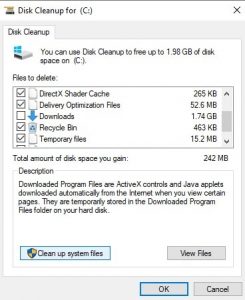
In addition, there must be enough space on your C drive for Windows to download updates directly to the needed folder. If you can’t discover a solution to free up the area on the disc, you can use the Disk Cleanup method to free up your hard drive swiftly. Here’s how you do it:
- First, click the Start button and type cleanmgr into the text area.
- Choose Disk Cleanup from the list of options.
- Select the C: drive and then press the OK button.
- Your device will now begin checking for temporary and unneeded files.
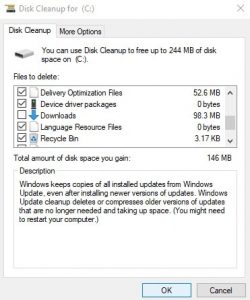
- Then, select the “Clean up system file” option.

- Select the C: drive once more and click the OK button.
- To delete this data, check all of the boxes and click OK.

- When the operation ends, restart your machine to remove any remnants.
3: Launch the Windows Update Troubleshooter
If something is wrong with your hardware, the Error 0xc1900101 message will appear on your screen. In this scenario, you can use Windows Update Troubleshooter to see if your hardware causes the issue. Here’s how you do it:
- First, tap the Start button, then select the Settings icon from the left sidebar.
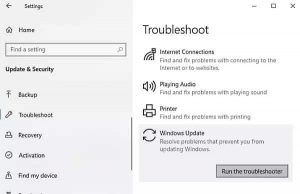
- To proceed, select the Update & Security category.
- Select Troubleshoot from the left window and then move to the right pane.
- Select Windows Update and then click the Run the troubleshooter option.
- Wait a few moments until the device recognizes the issues.
- When the scanning process ends, any problem related to the hardware will be discovered soon.
- So, you have to do is pick the faults and repair them.
It’s possible that it is not a hardware issue if it does not encounter similar problems. However, at this time, you must go to the following technique.
4: Use Windows Device Manager to resolve the 0xC1900101 Error
Microsoft advises that all system drivers be kept up to current. It is pretty helpful for third-party gadgets installed on your Windows. It is the network or graphics driver that is downloaded on your computer. If you cannot find the update through Windows, you must check the OEM website and update it. To correct it, follow the procedures below –
- Right-click the Start button and pick Device Manager from the menu that appears.
- Locate the driver that needs to be updated in the Device Manager window. A yellow exclamation mark is typically placed before the defined category so you can easily distinguish these drivers from the list.
- Expand each hardware area from the list of drivers and look for any issues.
- Once you’ve located the driver, right-click on it and select Properties.
- Navigate to the Driver tab in the wizard and select the Update Driver option.
- Select “Automatically search for updated driver software on the next page.”
- That’s all. Windows will detect, download, and install the driver automatically.
- Learn how to Import Outlook Contacts into Windows Live Mail here.
After completing the above guide, restart your device to see if the 0xC1900101 Error remains. If this method does not work, try the next one.
5: Uninstall any third-party security software
Anti-virus and security solutions are usually referred to as the computer device’s savior because they help safeguard it from malware and security breaches. However, when it appears to conduct high-level modifications in Windows Update, it becomes notorious and vulnerable.
In this example, it would be best to disable such software, including Windows Defender. You can also keep them away from your smartphone until the upgrade issues are fixed.
6: Launch Disk Checking Utility from the Command Prompt.
Windows Update may fail to owe to the advent of complicated disc difficulties. In that situation, open an elevated command prompt and type the command run chkdsk. You can then liberate Windows from the annoying troubles. Here’s how you do it:
- Firstly, click the Start button and type cmd.
- Choose Command Prompt from the list and then right-click it.
- Click Run as administrator from the context menu.
- If UAC appears on the screen, select the Yes option.
- Enter the following command line on the elevated Command Prompt.
C: chkdsk /f /r /x
- C – This is the disc where the operating system is installed. Depending on you, you can alter this to D: E: or any other letter.
- F – indicates that the scanned bugs have been resolved.
- R – denotes finding existing disc problems.
- X – stands for breaking up the disc volume to aid in detection.
- When you press the Enter key, the Disk Checking Utility begins scanning for faulty sectors.
- It will take some time; thus, wait until it’s finished.
- Finally, restart your device to ensure that the adjustments take effect.
7: Run a Clean Boot to install Windows Updates
You are in this state. If the previous solutions don’t work for the 0xC1900101 Error, you can restart your machine in Clean Boot State. In this scenario, you should run Windows Update and see if it works. However, there is a good chance that it will work. It keeps you linked to the internet, so you may download and install updates with minimal conflict.
ALSO SEE:Snapchat Streak


