Windows should continuously be updated, as patches fix issues and add new functionality. Users often utilize the OS’s graphical interface to seek and install updates. In certain circumstances, you may execute this operation to Run Windows Update from Command Line like using Command-line interfaces (CLI) tools such as Command Prompt and Windows PowerShell.
You may be required to handle updates on a Windows server, especially for other users. Alternatively, you may be developing a script that requires such instructions.
How Do I Run Windows Update from Command Line?
There are several ways to Run Windows Update from Command Line on a Windows PC.
Utilizing the Command Prompt
Microsoft utilizes Update Session Orchestrator Client UsoClient.exe to update system components in Windows 10 and 11. Previously, users could check for and install updates using this software from the Command Prompt like Run Windows Update from Command Line. However, you can check for updates in the most recent versions.
Regardless, you might try the following steps and see whether they work for you:
- To launch Run, hit Win + R.
- Type cmd to launch the elevated command prompt and hit Ctrl + Shift + Enter.
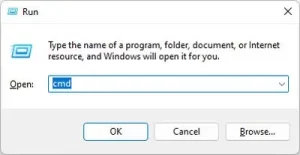
Enter the appropriate instructions based on the respective operations to Run Windows Update from Command Line:
- UsoClient StartScan – Commence the scan for update availability
- UsoClient StartDownload: Download but do not install the identified updates or fixes.
- StartInstall: Install all downloaded updates.
- UsoClient ScanInstallWait: Scans, downloads, and installs the updates while the user waits.
- UsoClient RestartDevice: Restarts the machine to finish the update installation.
- UsoClient ResumeUpdate: Restarts the update installation after a reboot.
- UsoClient RefreshSettings: Restores the default update settings.

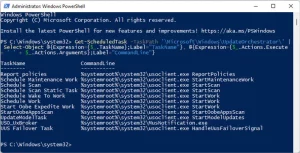
You may also determine whether UsoClient commands are available on your system by using the following Windows PowerShell command:
1. Open Run.
2. Enter PowerShell followed by Ctrl + Shift + Enter to launch the Elevated Windows PowerShell prompt.
3. Paste the following command and then click Enter:
Get-ScheduledTask -TaskPath

'\Microsoft\Windows\UpdateOrchestrator\' | Select-Object

@{Expression={$_.TaskName};Label="TaskName"},
@{Expression={$_.Actions.Execute + ' ' +
$_.Actions.Arguments};Label="CommandLine"}
In previous versions of Windows, the Windows Update Agent WUAUCLT.exe may be used to update Windows. Initially, you must activate Automatic Updates with scheduled installation through Group Policy. Otherwise, the Windows Update Agent cannot be used via the Command Prompt.
To do so,
- Open Run And Enter gpedit—MSc in Run to launch the Local Group Policy Editor.
- Windows Update is located under Computer Configuration > Administrative Templates > Windows Components.
- If it contains no policies but grows into other directories, navigate to Manage end-user experience.
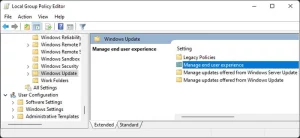
- Double-click on Automatic Update Configuration.
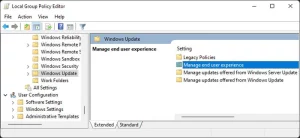
- Check Enabled and set Automatic update configuration to 4
- Download and install automatically.
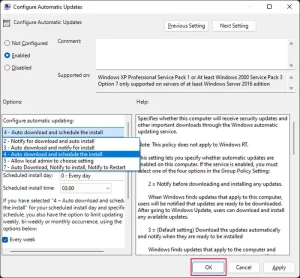
- You may select any timetable you like.
- Click Apply and then OK.
Then, you may use the below instructions at Prompt to Run Windows Update from Command Line via the Update Agent:
ALSO SEE: Download and Install Windows 10 on PC
- wuauclt /detectnow – Scans for update availability
- Installs all available updates.
- wuauclt /detectnow /updatenow – Combines the preceding two operations.

- Microsoft did not design WUAUCLT.exe and UsoClient.exe with end users in mind.
- Therefore, you will only receive information on whether the commands you enter into the Command Prompt are genuinely executed.
- The Prompt will indicate that these instructions have been completed even if they are still running in the background.
- You must estimate the amount of time necessary and wait till then.
- Therefore, we advocate utilizing Windows PowerShell, providing more thorough information during the procedure.
Utilization of Powershell
Windows PowerShell is a highly potent Windows CLI that allows you to perform everything Command Prompt does and much more. Naturally, it may be used to install Windows updates. Here is what must be done:
- Press Win+R to launch Run.
- To launch the Elevated PowerShell, type PowerShell and hit Ctrl+Shift+Enter.
- If you are using PowerShell 7, you may launch it by typing pwsh rather than Powershell.
Enter the following command to install and download the Windows Update Module or Run Windows Update from Command Line, which is required to execute the simple Windows update commands:
ALSO SEE: Windows Store Crashes
- Install PSWindowsUpdate Module

At the prompts, input the letter Y and hit Enter.
Enter the following update commands to conduct the necessary activities after installation:
Get–WindowsUpdate — Scan for available updates and present the results
Install–WindowsUpdate — Downloads and applies all available Windows updates
Get–WindowsUpdate –AcceptAll -Install –AutoReboot — Downloads and installs all available updates and, if required, restarts the computer automatically after installation.
Get–WindowsUpdate -Install –KBArticleID ‘KB5017859’ – Install the update for KB5017859.
You must replace the update ID ‘KB5017859’ with the KB Article ID from the Get–WindowsUpdate command.

Utilization of Visual basic script
Although the preceding command line techniques can execute Windows Update, they are neither interactive nor user-friendly to Run Windows Update from Command Line. So, Microsoft’s platform includes some Visual Basic Script (VB script) to execute an interactive updating process through the command line interface (CLI), particularly as a sample for developers.
ALSO SEE: Windows Netflix App Not Working
- Nevertheless, you can use this script for your purposes.
- Enter notepad in Run to activate this text editor.
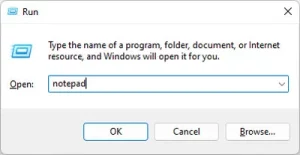
Then, depending on whether you want to install a specific update or all updates at once, use a web browser and navigate to the following Microsoft pages:
- All Available Updates Specific Updates
- Copy the script from the page into the newly-opened notepad.
- Ctrl + S will save the file.
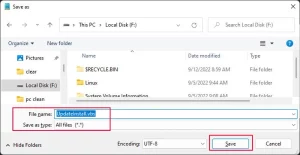
- Change the Save as type to All files and the Filename to UpdateInstall.VBS.
- You may use any name, but you must append it.VBS to it.
- Save it by browsing to the desired place and clicking Save.
- Open the elevated command prompt, then.
- Enter the command shown below while replacing the path:
- cscript “Folder location>UpdateInstall.vbs“

ALSO SEE: Windows 10 Not Detecting HDMI Monitor/TV
Additionally, you may right-click the script in the file explorer and select Copy as a path. Then, paste it after entering cscript and space to prevent typing the complete route manually. Then, adhere to the CLI’s on-screen instructions.
