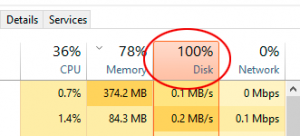
100% disk usage Users of Windows 10 who are experiencing issues such as slow response time should consult their Task Manager for assistance. Task Manager displays a wealth of information about the processes on your computer. The disc usage of your computer is one of the metrics you can monitor with Task Manager. If you see 100% disc usage, your machine’s disc usage is maxed out, and your system’s performance will suffer. Therefore, it would be good if you took corrective action.
windows 10 disk usage 100 means like many recently upgraded to Windows 10 users have reported that their computers are running slowly and that Task Manager says 100% Disk Usage.
Here are ten methods to resolve the issue of high 100% Disk Usage on your Windows 10 system. Some may take longer due to the stress and increased use of your hard drive.
Method 1: Restart Your System

You’ve probably noticed that restarting your computer can often solve various problems. Your Windows 10 100% Disk Usage issue is no exception. While this may not help you find the underlying cause of the problem, if it goes away, that may be enough for you.
Use the “Restart” option to restart your system from scratch, rather than the “Shut Down” option, which saves your system state but may not resolve your 100% Disk Usage.
Method 2: Update Windows
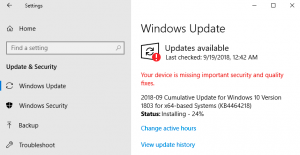
Installing the most recent updates can frequently resolve mysterious issues with your 100% Disk Usage Windows 10 system. Go to the “Update and security” area of the Windows Settings program to see if you’re up to date.
If new updates are available, you can check for them and install them.
Settings > Update and Security > Windows Update
It may increase your system’s overall performance, including the version of your hard disk.
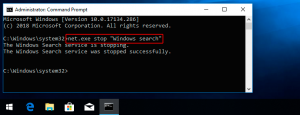
Method 3: Turn off Windows Search.
A known problem in Windows 8 and 10 can result in a search loop, accounting for your high disc consumption. To temporarily disable the Windows Search feature and see if it helps your disc issue, open an admin prompt and type net.exe to stop “Windows search.” It will disable Windows search until the next time Windows is restarted.
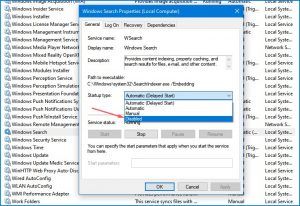
If it turns out that Windows Search bar was the cause of your Windows 10 disc utilization approaching 100% Disk Usage, you can permanently disable it by following this procedure:
Press Windows key + R, and type services.MSc, then press Enter.
The services window will be shown. Double-click the Windows Search entry to alter its attributes.
To save your settings, select Disabled under Startup type and then OK.
Method 4: Scan for Malware
Your computer could be infected with malware, causing your disc consumption to skyrocket. If you have antivirus software installed, it should have detected the problem. However, because nothing is flawless, compel your antivirus software to scan your hard disc for potential infections. Because your drive is already overburdened, this could be time-consuming, but finding and removing unwanted software may be essential.
Method 5: Disable the Super fetch service.
The Windows Super fetch service is another Windows 10 feature that can cause issues. With the command net.exe stop super fetch, you can temporarily disable this service as Windows search.
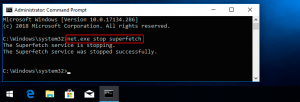
To permanently disable the service, follow the same steps for removing Windows search.
Method 6: Switch from Balanced to High-Performance Energy Options
This energy-setting tweak appears to have worked for many users who reported 100% Disk Usage on Windows 10.
Follow this procedure:
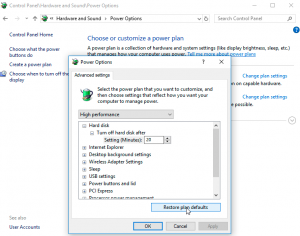
- Navigate to Power Options > Modify plan settings > Modify the advanced power settings.
- Select High-performance from the drop-down box and ensure that all plan settings are left at their defaults.
Method 7: Turn Off Your Antivirus Software Temporarily
Turning off your antivirus program temporarily is another step to take while analyzing the reason for your Windows 10 100% Disk Usage problem. Check to see whether this reduces your disc consumption. If this is the case, you might think about switching antivirus products. Even Windows Defender can cause issues by raising I/O and network traffic, which might result in excessive disc usage.
Method 8: Reset Windows 10 Virtual Memory
When your actual RAM runs out, virtual memory considers your disc as if it were RAM and uses it to swap out temporary files. Errors in the pagefile.sys file can result in 100% Disk Usage or consumption on your Windows 10 PC. The solution to this issue is to reset your virtual memory settings.
To reset your virtual memory, follow these steps:
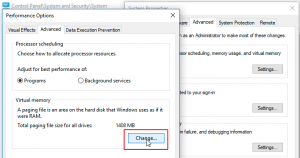
- Click on “Advanced system options” in your computer’s “System Properties.”
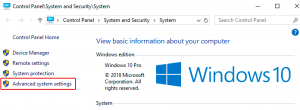
- In the Performance section, click “Settings.”

- Click the “Change” button after selecting the “Advanced” option.
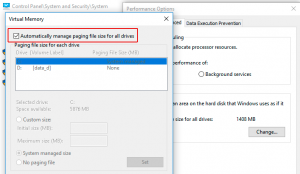
- Check the box labeled “Automatically manage paging file size.”
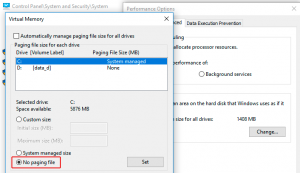
- Alternatively, you can select “No paging file,” click OK and reboot. It will prevent the use of virtual memory and may improve the disc performance of your system.
Method 9: Run Check Disk
A check disc can tell you if your hard drive has any physical issues. A high disc consumption usually suggests that an application or logical problem is causing the disc usage, but it is worth your time to rule out any physical damage. So run check disc and take note of the results.
Method 10: Modify Google Chrome and Skype settings
Some users have noticed that making these adjustments to your Google Chrome and Skype settings will help you save disc space.
Make the following change in Chrome:
- Configuration -> Display advanced options.
- Uncheck the “Use a prediction service to load websites more rapidly” option under Privacy.
- It would be best if you also attempted to disable Flash in Google Chrome.
To update your Skype settings, follow these steps:
- To launch Skype for Windows 10, go to the Start menu in the bottom left corner of your screen. Then, please scroll down to Skype for Windows 10 in the list of available applications and click to open it.
- Choose the Security tab and then the Edit option.
- Select “ALL APPLICATION PACKAGES” from the selection of “Groups or Usernames.” Then, check the Write checkbox to allow Skype to write to your 100% Disk Usage.
- Click OK.
ALSO SEE: List of Driver Booster 6 Keys
Winzip Activation Code Free To Register
If none of these approaches cure your problem with 100% Disk Usage on your Windows 10 computer, you may need to consider replacing your hard drive. One last thing to try is to disable any running automatic defrag processes, as they may be causing issues. In general, your hard disc should never be at 100% utilization. Thus, there is a cause for the state. You must resolve the problem windows 10 100% disk usage or risk having a very slow PC.