
You have DISM error 267, “unable to access the image,” but you do not know how to resolve it. This article describes what causes DISM error 267 and how to resolve it. Before demonstrating how to resolve the issue, I will explain why you received the error notice.
It may be found in my first section.
Once you have determined the reason for DISM error 267, you may utilize the three methods outlined in section two to resolve the problem message. I also have a Frequently Asked Questions area where I address several inquiries regarding DISM, notably Error 267.
Why Did You Receive DISM Error 267 “Cannot Access The Image”?
You will receive error 267 if you execute the DISM command with the /image switch directly on a WIM, VHD, or VHDX file.
Because DISM expects a mounted image, this error occurs.
In my situation, I received error 267 when I executed the following DISM command.
DISM /image:"F:\sources\install.wim" /?
Here is the command’s output.
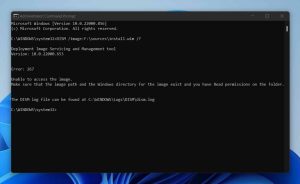
This error notice can be resolved by mounting the WIM, VHD, or VHDX file. Then, execute the preceding DISM command and provide the location where the image file was mounted.
In the next step, I describe how to resolve DISM error 267.
How to Repair DISM Error 267 Unable To View The image. Follow the procedures in this section to correct DISM error 267, “unable to access the image.” In this section, each stage is discussed in its part.
Perform Pre-Task Requirements
Before continuing, please complete the following:
- The Windows image (WIM, VHD, or VHDX) should be copied to a folder. If you interact with them, Microsoft puts WIM files in the Windows installation media sources folder. Microsoft refers to the WIM file installation as an install.
- WIM. You should replicate the installation. WIM from the sources folder to a different folder since mounting the file from its original read-only location may result in an access forbidden error. Create a folder in which to mount the Windows image. My folder will be named Windows11MountDir.
- I am doing the example in this article using an installation of Windows 11. WIM file. The instructions in this article can also be used to mount a VHD or VHDX file. When working with these kind of files, copy them to a different place. Then, create a folder where the Windows image will be mounted.
Retrieve The Windows Image Index
Before you can mount a Windows image, you must have the image’s index number or name. To obtain the index of a Windows image, use Command Prompt as an administrator and then enter the following command:
DISM /Get-WimInfo /WimFile:D:\WIMfiles\install.wim
- Replace D:WIMfiles with the full path of your file.
- The function reveals the specifics of all Windows images included within a WIM, VHD, or VHDX file. Take note of the index number of the edition that you wish to mount.
I will mount “Windows 11 Pro” in this example; its index number is 6.

Mount The Windows Image And Then Run DISM /Image Again
Mounting the Windows image is the last step in correcting DISM error 267, “unable to access the image.” To mount the Windows image using the index number indicated in the previous step, use a command identical to the one shown below:
DISM /Mount-image /imagefile:D:\WIMfiles\install.wim /Index:6 /MountDir:"D:\Windows11MountDir"
- Replace D:WIMfiles with the location where you stored your file. Then, replace D: Windows11MountDir with the mount folder you previously established.
- When the command is executed, it will take some time to complete.
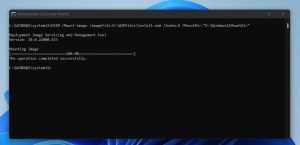
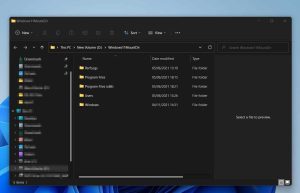
- When the command completes, open the folder where the image was mounted. The folder hierarchy will resemble a standard Windows installation folder.
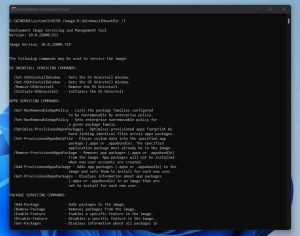
- Lastly, to resolve DISM error 267, “unable to access the image,” execute DISM using the /image switch. However, instead of supplying the path to the Windows image, mention the folder directory where the Windows image was mounted.
I have mounted my Windows image (a WIM file) at D: Windows11MountDir; thus, I will execute the following command.
The command DISM /image:D:Windows11MountDir /?
As shown in the image below, the DISM command was completed properly without error 267 this time!
When you are finished working with a mounted image, it is advisable to unmount it. To unmount the image and save the modifications, use the command below.
DISM /Unmount-image /MountDir:D:\Windows11MountDir /commit
- Microsoft Windows 11 Mount Directory /commit
However, if you desire to discard any modifications you made to the picture or if no changes were made, use the command below.
DISM /Unmount-image /MountDir:D:\Windows11MountDir /discard
- Windows11MountDir/reject
- Remember to alter the directory – D:
- Windows11MountDirM – to the directory where the image was mounted.
Frequently Asked Questions:
What is DISM used for?
DISM is a command-line utility for servicing and preparing Windows Operating System images. You may use DISM to service an operating system currently running and a Windows image.
How can I resolve DISM errors?
- Since DISM contains several potential faults, the most straightforward approach to repair any DISM mistake is to examine the DISM error log – C:WINDOWSLogsDISMdism.log – as a starting point.
- Scroll to the bottom of the dism.log file to view the most recent logs. When you examine the logs, you will be able to determine the source of the DISM problem.
What does the DISM command with the /ScanHealth option accomplish?
When /ScanHealth is passed to DISM, the Windows image is scanned for component store corruption. To execute DISM with the /ScanHealth switch, the /Cleanup-Image switch must be specified.
Here is the complete command to scan for component store corruption on a running operating system…
Does DISM Need a Restart?
Perhaps not necessarily. Some DISM commands may necessitate a system restart, while others do not.
What Is the DISM.EXE /Online /Cleanup-image /Restorehealth Command?
- The /Online switch instructs DISM to execute the /Cleanup-image /Restorehealth command on the currently running Operating System.
The /Cleanup-image option with the /Restorehealth parameter further searches the image for component store corruption. - Using the /Cleanup-image /Restorehealth option and argument, the idea is automatically repaired once DISM scans the Windows image for compone’nt store corruption.
My Last Words:
The inability to access the picture is one of the several DISM error signals. As detailed in this tutorial, DISM raises error 267 when the /image switch is applied to an unmounted image when running the DISM command.
ALSO SEE:Best FAQs Related To Apple iPhone 14 Pro and 14 Pro Max
Also, as demonstrated in this article, mounting the Windows image before executing the DISM command with the /image option resolves DISM error 267.