
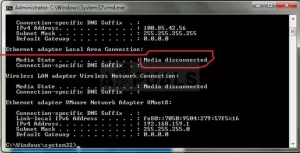
The troublesome like Media Disconnected error message is shown after running the command “ipconfig /all” in Command Prompt, which displays the devices and settings associated with your Internet connection. This mistake might arise in various contexts and as a solo message, but its intent remains the same.
Actual connection issues may follow the message, but they might also appear without any apparent problems with your Internet connection. In any case, it’s inconvenient, so use the procedures listed below to prevent it from happening again.
Solution 1: Remove the driver and restart the computer.
Suppose anything has gone wrong with the network device driver causing the Media Disconnected error in “ipconfig /all” (it might be the wireless or Ethernet driver). In that case, you can usually always remedy the problem by uninstalling it and restarting your computer.
Restarting the computer will start the search for drivers as soon as the system boots, and it will be installed using the most recent release. Best wishes.
- First and foremost, you must delete the driver that is presently installed on your PC.
- To launch the device manager window, type “Device Manager” into the search area next to the Start menu. You may also enter the Run dialogue search box using the Windows Key + R key combination. In the box, type “devmgmt. MSC” and press the OK or Enter key.
- Expand the section “Network Adapters.” It will list all network adapters that are currently installed on the computer. Next, uninstall the network adapter by right-clicking it and selecting “Uninstall device.” It will uninstall the networking device and remove the adapter from the list. Make sure you choose the right one based on the type of connection causing you problems.
- When requested to remove the device, choose “OK.”
- Remove the adapter you’re using from your computer and restart it immediately. The updated driver should be loaded directly once the PC boots, without your action. However, if your Internet connection is not working, you must manually install the driver.
- Go to the manufacturer’s website to view a list of available drivers for your operating system. Please select the most recent version, download it, then launch it from the Downloads folder.
Follow the on-screen directions to install the driver, and keep the adapter unconnected until the installer invites you to connect, which it may or may not do. After the installation is finished, restart your PC and attach the adapter. Then, check to determine whether the irritating Media Disconnected error message persists.
Solution 2: Turn off network sharing.
It’s conceivable that you mistakenly activated this option when attempting to troubleshoot or share your Internet connection with other devices. Simply removing this option may help you solve the problem quickly, as it has for many different customers who have had the same difficulty. Follow the steps outlined below!
- To open the Run dialogue box, use the Windows Key + R key combination and type “ncpa. Cpl” before clicking OK. It is also possible to open the Control Panel. For example, switch to Category and choose Network & Internet. To open the Network and Sharing Center section, click on it and then on the Change adapter settings option on the left side of the window.
- Right-click on the connection you’re presently using and choose Properties. Next, switch to the Sharing tab and uncheck the checkbox next to the option “Allow other network users to connect through this computer.”
- To implement the changes, click OK or Apply, restart your computer, and check to see whether the problem Media Disconnected persists in Command Prompt or elsewhere.
Solution 3: Resetting TCP/IP
Resetting TCP/IP resolved the Media Disconnected issue for several people experiencing it. They also provided a hotfix file that would immediately resolve the issue. However, if the file does not work correctly for you or Microsoft disables the link below, you can follow these instructions manually.
- Click the Download button on Microsoft’s page to reset TCP/IP automatically. Next, click “Run” or Open in the File Download dialogue box.
- Follow the instructions in the easy fix wizard to resolve the issue of Media Disconnected.
- To save changes, restart your computer.
Manually Resolve the Issue
You will need to utilize the Command Prompt to repair the problem of Media Disconnected manually. The solution will be available for multiple Windows operating systems.
Windows 8, Windows 8.1, and Windows 10 are all available.
Type CMD into the Start screen or the search menu button next to it. Right–click Command Prompt in the search results and select and click Run as administrator.
Enter the following command at the command prompt box, then click Enter:
netsh int ip reset c:\resetlog.txt
- Note If you don’t wish to specify a log file directory path, use the following command instead:
netsh int ip reset
- Start the computer again.
- Windows Vista and Windows 7
- Select Start and then type cmd in the files box to launch a command prompt.
- Right-click the Command Prompt icon under Programs and select Run as administrator.
- Select Yes when the User Account Control box displays.
Enter the following command at the command prompt box, then click Enter:
netsh int ip reset c:\resetlog.txt
- Note If you don’t wish to specify a log file directory path, use the following command instead:
netsh int ip reset resetlog.txt
- Start the computer again.
Microsoft Windows XP
- Select Start > Run >> Type “cmd” in the Run dialogue box to launch a command prompt.
- Enter the following command in the Open box, then press Enter:
netsh int ip reset c:\resetlog.txt
- Note If you don’t wish to specify a log file directory path, use the following command instead:
netsh int ip reset resetlog.txt
- Start the computer again.
- The reset command overwrites the following registry keys, which are both needed by TCP/IP:
SYSTEM\CurrentControlSet\Services\Tcpip\Parameters

SYSTEM\CurrentControlSet\Services\DHCP\Parameters
- It is equivalent to uninstalling and reinstalling TCP/IP. To correctly run the manual command, you must give a name for the log file in which the netsh operations will be logged. (In the manual processes previously in this section, this log file is referred to as “resetlog.txt.”)
- To complete the procedures, you must be logged in as an administrator on the computer.
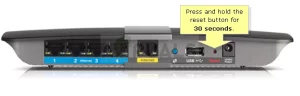
Solution 4: Reset Your Router to Factory Settings
Whether there is an issue with your router, you may resolve it by factory resetting it and checking to see if the problem of Media Disconnected has been resolved. It is not a complex process, and it has aided many individuals, but the new issue is that most router manufacturers have unique methods of resetting their routers. Still, there are some parallels.
If the issue is with your device, laptop, or notebook, use Restoro Repair to check the repositories and repair corrupted or missing data. It works in most circumstances if the problem is caused by system corruption. Restoro may be downloaded by Clicking Here
- Turn your home router on and move it to the side using the Reset button. It can be on the back or the bottom. Whether there isn’t one, check the handbook to see if the Power button may be used for the same thing.
- Hold the Reset button for at least 30 seconds with something tiny and sharp, such as a paperclip.
- Wait another 30 seconds after releasing the Reset button for the router to reset and power back on correctly.
- If the standard 30-second version does not work, try the 30-30-30 hard reset rule, which includes holding the reset button for 90 seconds instead of 30.
- If you have conducted the procedure but the problem has not been resolved of Media Disconnected, you may always use your browser to execute another reset, which will essentially reset your settings.
- Open a web browser, enter your Default Gateway number (typically 192.168.1.1) into the address box, and click Enter. To check out for sure, use the Windows Key + R key combination and type “cmd” before clicking OK. Then, in the Command Prompt window, type “ipconfig” and copy the number next to Default Gateway.
- To access your router’s interface, enter your username and password. The default login and password should be mentioned in the instructions for your router, or you can find it on the Port Forward website. If you’ve updated your username and password, use those instead.
The options we’re looking for may be in a different locations for different router manufacturers. Still, they’re usually easy to find in the general navigation tab or Wireless Settings. Next, click the Reset Settings button and confirm any dialogue boxes that appear. After completing the process, restart your computer to verify whether the problem of Media Disconnected has been resolved.
Solution 5: Modify the Link Speed Setting
Expand the section “Network Adapters.” It will list all network adapters that are currently installed on the computer. Then, select Properties by right-clicking on the network adapter you wish to use.
- When this suspicious option is set to “auto–negotiation,” some older routers encounter similar difficulties, so be sure you change it. The choice can readily be found in Device Manager by checking under the device causing the problems of Media Disconnected.
- First and foremost, you must delete the driver that is presently installed on your PC.
- To launch the device manager window, type “Device Manager” into the search area next to the Start menu. You may also enter the Run dialogue search box using the Windows Key + R key combination. In the box, type “devmgmt. MSC” and press the OK or Enter key.
- Navigate to the Advanced tab and look for Link Speed and Duplex Mode choices. If you find them, modify the Value option on the right to your actual connection speed or Full Duplex, and save your modifications.
Solution 6: Restore the system
System restoration might be considered a last resort, but the process is not as tricky or urgent as it may appear. Returning your laptop to a condition only days before the mistake began will repair the problem without requiring any substantial changes to your device. It’s one of the more effective approaches, so give it a go before quitting.
- First and foremost, we will activate your computer’s System Restore program. First, search for System Restore in Windows 10 using the Search button or the Start menu and begin typing. Then, choose to Create a restore point.
- The current settings will be shown in the System Properties box. Open the Protection Settings pane inside this window and ensure that protection is activated on the system drive.
- If it is currently deactivated, select it and click the Configure option to enable protection. You should also reserve enough storage space for system protection. You may set it to whatever size you want as long as it’s at least a few gigabytes if you want to preserve additional restore points. To apply the adjustments, click Apply and then OK.
- When new software is installed, or an essential change occurs on your computer, the system will now automatically generate a restore point.
- After you’ve successfully enabled it, let’s return your PC to the condition before the debugger issue occurs. Make a backup of any critical documents or programs you’ve generated or installed in the meanwhile to be safe, especially if you’ve created them recently.
- Using the Search button next to the Start menu, look for System Restore and click Create a restore point. Select System Restore from the System Properties box.
- Select the option. Choose a different restore significance from the System Restore box and click the Next button.
- Choose a previous restoration point that you manually stored. You may also choose any restore point from the list and click the Next button to begin the restoration procedure. After the process is completed, your computer will be returned to the state it was in at the time.
Solution 7: Restart Winsock and the IP Stack
In certain circumstances, the Media Disconnected error may still occur even after following all of the instructions outlined above. As a result, in this step, we will reset Winsock and the IP stack. To accomplish this:
- To open the Run prompt, press “Windows” + “R.”
- To provide administrator rights, enter “cmd” and press “Shift” + “Ctrl” + “Enter.”
- Enter the following instructions one at a time, pressing “Enter” after each one to execute them.
netsh winsock reset catalog
netsh int ipv4 reset reset.log
netsh int ipv6 reset reset.log
- Check to see whether the problem of Media Disconnected has been resolved.
Solution #8. Restarting Ethernet
Users could get around the problem in certain situations by deactivating it and re-enabling it after some time. To accomplish this:
- To open the Run prompt, press “Windows” + “R.”
- Enter “ncpa.cpl” and click “Enter.”
- Select and click “Disable” from the context menu of your Ethernet connection.
- After some time has passed, right-click it again and select “Enable.”
- Check to check whether the problem still exists.
ALSO SEE: Apple TV Not Working?
Also, attempt to turn off any network monitoring software you may have installed if Media Disconnected error persists, such as Spydoctor or any other program. In certain circumstances, on older computers/routers, a wireless switch must be switched on, either on the machine or on the router, so keep an eye out for that.