
Is your Windows 11 PC stuck in the “Scanning And Repairing Drive” mode? Don’t be alarmed! This tutorial provides two solutions to this problem. But, before I get there, let me explain three possible causes of this problem. Following that, you may read the ways to resolve this issue. Finally, I’ve included a FAQ section that should address most of your remaining queries concerning this problem.
3 Causes of the “Scanning and Repairing Drive” Error in Windows 11
In the next part, I will describe three critical reasons.
If You Shut Down Your Computer Forcibly
- Windows will not perform a “clean” shutdown if you shut down your computer by pushing and holding the power button. It may result in file corruption.
- Windows 11 may display the “scanning and repairing drive” error if some Operating System files get damaged.
If you use the /F switch when running CHKDSK,
- CHKDSK is a Windows command that may be used to check for file system faults on a Windows drive. For example, the order will fail if you use the CHKDSK command while signing in with the /F switch on the Windows installation disc.
Instead, you’ll get the message below:

- When you enter Y and hit the enter key, your Windows 11 PC will restart with the message “scanning and repairing disc.” This process should ideally go quickly, and your machine should boot correctly.
- In rare situations, your Windows 11 PC may become stuck on the “scanning and repairing disc” screen.
If you have some corrupt sectors on your hard drive,
- It is another possible cause of the “scanning and repairing drive” problem. If your computer’s storage drive contains faulty sectors, Windows 11 may attempt to fix them.
- As a result, when you restart the computer, you may get the “scanning and repairing drive” notice. However, as I previously stated, this procedure should go nicely.
- Unfortunately, Windows 11 can sometimes become stuck in the “scanning and repairing drive” window.
After explaining the three most common causes of this error message, I’ll lead you through the procedures to resolve it.
Step 1: Launch Windows 11 in Safe Mode.
- While the notice is shown on your computer, push and hold the power button until the machine shuts down.
- Then, to start your computer, push the button. Wait around 2 seconds after the machine boots up. Then, keep the power button down until the machine turns off.
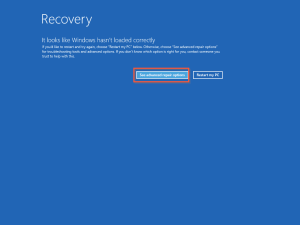
- The PC will display the Recovery screen below after the third hard reboot (hitting the power button to shut down your PC). Next, click View more sophisticated Scanning And Repairing Drive choices.
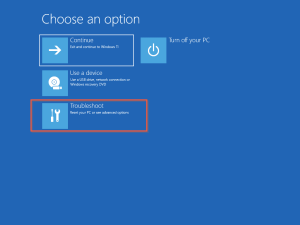
- The PC will then display the Choose an option screen, on which you should click Troubleshoot.
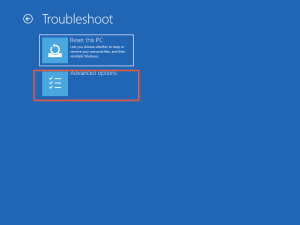
- Select Advanced options when your PC shows the Troubleshoot screen.
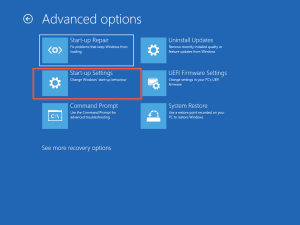
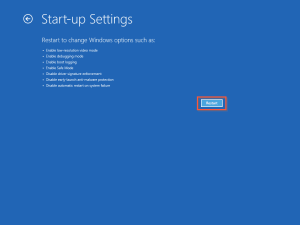
- The Advanced settings page will appear on your PC; click Start-up Settings.
- Then, on the Start-up Settings screen, press the Restart button. The Startup Settings screen will appear on your PC.
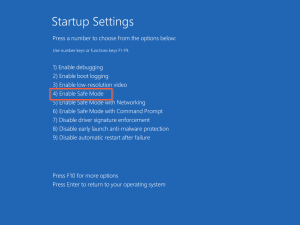
- Finally, on the Startup Settings page, hit the F4 key on your keyboard. Safe mode will be activated on your computer.
- Log in with your usual password or PIN. Then go to the following step, which is listed below.

Step 2: Resolve The “Scanning And Repairing Drive” Windows 11 Error Using One Of The Method Below.
Once your PC has booted into a Safe Mode, utilize one of the procedures indicated in this section to resolve the issue.
Method 1: Look for File System Errors on Your Windows 11 Installation Drive
I indicated before in this post that you can get the “Scanning And Repairing Drive” Windows 11 problem if your computer’s disc contains faulty sectors.
Follow the procedures below to resolve it:
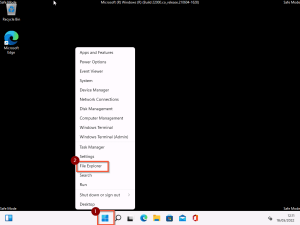
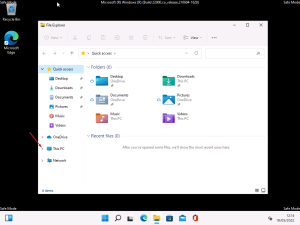
- Right-click the Windows Start menu when signed in to your Windows 11 PC in Safe mode. Then, choose File Explorer.
- Then, in File Explorer’s left pane, expand This PC.
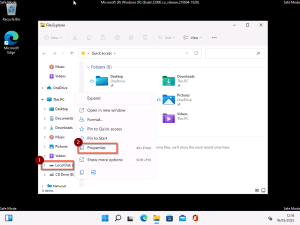
- Locate and right-click the computer’s drive C while This PC is enlarged. Then, from the list of available steps, choose Properties.
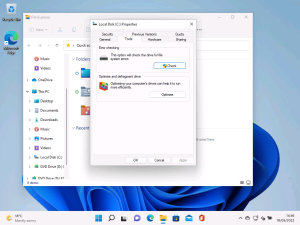
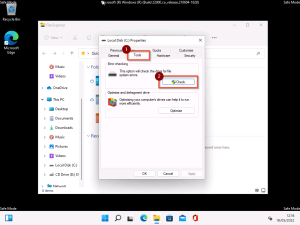
- Then, pick the Tools tab on the Local Disk (C:) Properties box. On the Tools tab, in the Error-checking section, click the Check button.
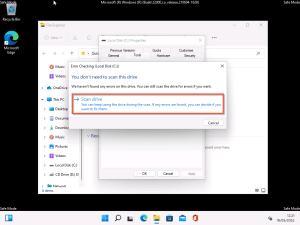
- Windows may show a notice stating that no faults were found on the disc. Ignore that and continue with Scab drive. Then, wait for the scan to finish.
- If the scan uncovers any issues, Windows will give you the option to remedy them. Choose the Repair Error option.
- When the procedure ends, restart your Windows 11 computer as usual.
If the procedures in Method 1 above do not resolve the “Scanning And Repairing Drive” Windows 11 issue, go to Method 2.
Method 2: Restart Your Computer After Running CHKDSK
If you attempted to approach one and rebooted your computer before proceeding with method 2, you must first Boot Windows 11 To Safe Mode (link opens in a new browser tab).
- Right-click the Start menu and select Run when your machine is in Safe mode.
- Then, when the Run window appears, could you type the following into it and press OK?
%WINDIR%\System32
- When you type this command into Run, it will open the System32 folder.
- Then, in the System32 folder, look for cmd.exe. Select and click Run as administrator from the context menu when you right-click cmd.
- It will launch the command prompt.
- Enter the following command below at the command prompt. Then, on your keyboard, press the enter key.
/F CHKDSK
- Finally, turn off your computer.
- When you restart your computer, you will still see “Scanning and Repairing Drive.” Don’t freak out.
- The scan was started this time with the CHKDSK command. It should correctly scan your machine and restart it properly.
Frequently Asked Questions About the “Scanning and Repairing Drive” Error in Windows 11
1. How Can I Resolve Disk Errors in Windows 11?
The /F switch on CHKDSK is the most accessible approach to correct disc issues in Windows 11. You may also right-click the drive with the disc problems and choose Properties.
Then, under the Error checking section, click the Check button after clicking the Tools tab.
2. Why does my computer keep telling me to restart to correct drive errors?
There are three possible reasons why your computer keeps prompting you to restart and Scanning And Repairing Drive disc.
1. If you execute CHKDSK on the system drive with the /F switch,
2. Your PC will also display disc errors if specific disc sectors are damaged.
Finally, if you shut down your computer by pushing the power button, your PC may continue to say restart and Scanning And Repairing Drive disc.
3. How Long Does A Computer Take To Repair Drive Errors?
A PC may take 10 to 15 minutes to correct driver issues. It, however, is impacted by the status of the disc or its size.
4. What’s the distinction between CHKDSK and SFC?
What distinguishes CHKDSK and SFC is what they do. For example, in Windows, you use CHKDSK to repair disc errors.
On the other hand, SFC scans the integrity of all protected Windows system files and replaces incorrect versions with authentic Microsoft ones.
5. Is DISM or SFC better?
None are superior since they perform somewhat different functions. DISM is a tool for managing Windows images. When you run SFC, it analyses the integrity of Windows files and replaces any files that have been replaced by malware with the correct version.
Most of the time, I utilized both DISM and SFC to resolve Windows issues.
“Scanning and Repairing Drive” Error In Windows 11: My Final Thoughts
In this post, I’ve discussed three possible causes for your Windows 11 PC to exhibit the “Scanning and Repairing Drive” issue. Then I provided a step-by-step procedure for resolving the issue. To quickly repair this mistake, boot your Windows 11 into Safe mode. Then, on the drive in question, run a disc check. Alternatively, run CHKDSK with the /F switch while in Safe mode and then restart your computer.
I hope you were planning on following the steps in this tutorial to get your PC working again. If you found the guide helpful, please click Yes. Was this useful? Below.
You can also provide us with specific comments or tell other readers about your experience with the “Scanning and Repairing Drive” problem. Please use the “Leave a Reply” box at the bottom of this page to express your opinions.