There are several scenarios in Windows 10 where your Headphone Not Working or Headphone jack Not Working. Audio difficulties can be caused by anything from lousy hardware to a system problem. In this post, we’ll look at how to correct them regardless of what triggered the crisis.
What is the problem with my headphone jack?
Windows 10 is a complicated Operating System with complex problems. Finding out what caused your headphones or Headphone jack Not Working and takes some help. The list below contains some of the most prevalent reasons for this issue. Use this data to identify your problem and implement the most effective remedy from our post. Physical harm. It will likely not function if your Headphone jack Not Working or broken. Examine each to determine if any physical damage might interfere with the devices’ functionality.
There was an error with the software. You may be unable to use your smartphone if a program loaded on it interferes with your headphones or headphone jack. Uninstall or tweak the troublesome program to resolve the issue of Headphone jack Not Working.
outdated drivers. Your drivers enable your devices to work with Windows 10. If your sound and audio drivers are outdated, you may experience problems utilizing headphones or the Headphone jack Not Working. The best solution is to update your drivers.
problems with the system. When Windows 10 is experiencing problems, you may be unable to utilize your headphones or the headphone jack. However, you can use the methods listed below to troubleshoot these problems and resolve them.
Are Headphone jack Not Working in Windows 10?
Now that we’ve looked at some potential problems, it’s time to work on solving them. Use the procedures listed below to troubleshoot your headphones or the headphone jack on Windows 10.
Method 1: Connect your headphones to your computer and restart it.
- Plug your headphones into the headphone jack while your computer is still on.
- Before restarting your computer, wait a few seconds:
- Then, click the Power button in the Start menu.
4. Choose Restart.
5. Wait for your machine to restart completely.
6. After your smartphone has rebooted, check to see if the headphones are still working.
Method 2: Turn off front panel jack detection.
If you have a Realtek sound card, you can try to resolve this issue by removing the front panel jack detection.
Don’t worry; this does not necessarily imply that the front panel jack will no longer be usable. In other circumstances, the reverse is true. This procedure can resolve the problem with your front panel jack not working.
- In your search box, type Control Panel, and then launch the program from the results.
- Change the view mode to Large Icons” using the drop-down menu in the top-right corner of the window.
- Scroll to the bottom and choose Realtek HD Audio Manager. If you don’t see this option, you’re either missing the necessary drivers or using a different sound card brand.
- Select the Connector Settings option.
- Select “Disable front panel jack detection,” then push the OK button.
- Start your computer again. After that, try inserting your smartphone into the headphone socket and listening to some music.
Method 3: Modify the default audio format
- In your search box, type Control Panel, and then launch the program from the results.
- Change the view mode to “Large Icons” using the drop-down menu in the top-right corner of the window.
- Navigate to the Hardware and Sound tab.
- Choose sound.
- Double-click the default playback device in the Playback section. A new window should appear.
- Navigate to the Advanced tab. Change the default sound format to anything different from the drop-down menu.
- Restart your PC by clicking the OK button. Then, check whether your headphones or headphone jack are in good working order.
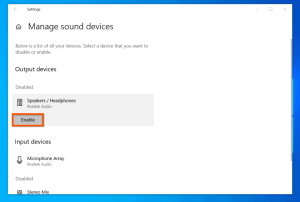
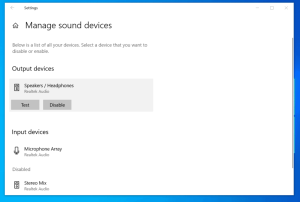
Method 4: Enable the playback device and make it the default.
- In your search box, type Control Panel, and then launch the program from the results.
- Change the view mode to “Large Icons” using the drop-down menu in the top-right corner of the window.
- Navigate to the Hardware and Sound tab.
- Choose sound.
- Right-click anywhere in the playback area and pick the Show Disabled devices option. This would bring up your device even if it were previously hidden.
- Right-click on the inoperative headphone device. Select Enable to ensure that it is not prevented from playing audio from your PC.
- The Set as Default button is now accessible.
- Restart your computer by clicking the OK button. Next, check whether your headphones or headphone jack are in good working order.
5. Launch the Windows 10 Audio Troubleshooter.
Windows 10 has several very handy troubleshooters. Fortunately, there is also one for audio and sound troubles.
Take note that these troubleshooters are simple to use and available to everyone. Although it is not guaranteed that the Sound Troubleshooter will properly locate and repair Your issue, it is worth a shot!
Press your keyboard’s Windows + I buttons to launch the Settings app. Alternatively, in the Start menu, select the gear symbol.
- Select the Update & Security tab.
- Select Troubleshoot from the left-hand menu.
- Under the Getup and Running category, choose Playing Audio.
- Select the “Run Troubleshooter” option.
Allow the troubleshooter to check for problems of Headphone jack Not Working. Then, if anything is discovered, you can have it fixed automatically.
After the troubleshooter has attempted a solution, try listening to some sounds through your headphones. If you still can’t hear anything, don’t panic; we have numerous different options for you to try!
6. Update your audio and sound drivers.
Updating your drivers regularly is something you should do all the time. Unfortunately, outdated audio drivers might create more problems than you would realize.
- Hold down the Windows key and hit R. This will start the Run program.
- To open the Device Manager, type “devmgmt.MSC” without quotation marks and press the OK button.
- Click the arrow symbol to expand the sound, video, and gaming controllers section.
- Select Update Driver from the context menu when you right-click on your audio driver.
- Select “Automatically search for updated driver software.”
- If Windows discovers an updated driver, it will download and install it on your machine.
- Restart your computer to see whether the headphones or Headphone jack Not Working problem has been resolved.
Last thoughts
We hope this post helped resolve the issue with your headphones and the Headphone jack Not Working on Windows 10. If you want more assistance, don’t hesitate to contact our IT specialists at techfixes.
ALSO SEE: Windows 10 Mobile Hotspot Not Working
Consider subscribing to our email if you’re seeking additional guides or want to read more tech-related articles. We offer tutorials, news stories, and recommendations daily to assist you in your day-to-day computer life.