Is there anything you need to capture on your screen? In Windows 11, use the Snipping Tool. It is how. For a long time, Windows could snap screenshots with the Snipping Tool. Still, Windows 11 (2022) replaces the historical Snipping Tool and Snip & Sketch programs with a new version that combines the most significant capabilities of both apps with an updated UI.
The new software allows you to snap screenshots in a variety of ways. For example, you can select a rectangle, use the access mode, or instantly capture a window or the entire screen. The second component of the experience is the new editor, which allows you to crop, annotate, save, and share screenshots.
This post will lead you through the steps of taking screenshots using Windows 11’s Snipping Tool program.
How to Take Screenshots Using Snipping Tool
The Snipping Tool is an easy-to-use program. On Windows 11, you may take screenshots using an app or a shortcut. In addition, you may customize the app’s settings, such as using the Print Screen button instead of the Windows key + Shift + S shortcut.
App-based screen capture
To capture screenshots using the Snipping Tool app, follow these steps:
- Start the program.
- To open the app, search for Snipping Tool and pick the first result.
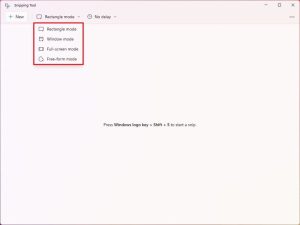
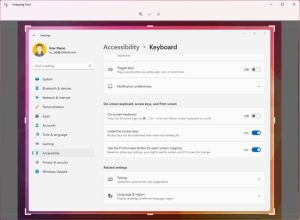
- Choose one of the various screen capture modes, such as:
- Rectangle mode – uses the mouse to make a rectangle screenshot.
- Window mode – takes a screenshot of a window and stores it.
- Full-screen mode – captures an image of the whole screen.

7. Free-form mode lets you use the mouse to choose any shape from the screen.
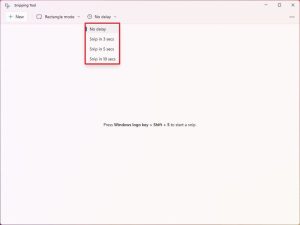
8. (Optional) Delay the capture for 10 seconds using the Delay option.
9. This option of Snipping Tool might be helpful when attempting to capture a specific activity by Snipping Tool.
10. Select the “New” option.
11. Make a screenshot in the mode you choose.
12. When you finish the steps, the snapshot will open in the Snipping Tool editor, where you may save or annotate it before sharing it.
Screenshot via shortcut
On Windows 11, you can now use a keyboard shortcut to rapidly bring up the tools for taking a screenshot. Here’s how it’s done:
- First, use the keyboard shortcut Windows key + Shift + S.
- Choose one of the following screen capture modes:
- Rectangle shape mode.
- Windowed mode
- Full-screen mode is available.
- Mode of free-form expression.
- Make a screenshot using the option you choose.
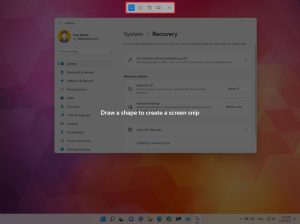
- The capture will be opened in the Snipping Tool editor when you finish the instructions.
Changing a screenshot
Follow these procedures to alter and save the screenshot:
- Then, in the command bar, select the Image Crop tool.
- Crop and resize the screenshot using the edges.
- To save the changes, click the Check button.
4. Annotate the image with the Ballpoint pen, Highlighter, or Touch Writing capabilities.
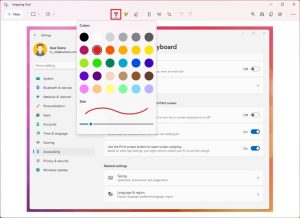
5. A quick tip: to annotate the image, use the ballpoint pen or Highlighter to modify the color and stroke size.
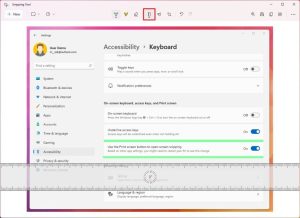
6. Draw straight lines using the ruler (optional).
7. To remove strokes, use the Eraser tool.
8. (Optional) In the right corner, click the Copy button to copy the image to the clipboard and paste it into a document.
9. To save the screenshot as an image, click the Save button in the upper right corner (.jpg, .png, or.gif).
- Click the Share button in the right corner to share the capture with others.
- The screenshot will be saved on your computer when you finish the instructions.
Snipping Tool parameters need to be adjusted.
The Snipping Tool allows you to customize several parameters.
Follow these procedures to modify the app’s settings:
- Start the program.
- To open the app, search for Snipping Tool and pick the first result.
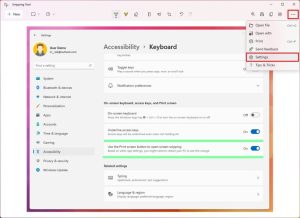
- Select the Settings option from the See more (three–dotted) menu.
- Enable or deactivate the following parameters on the Settings page as needed:
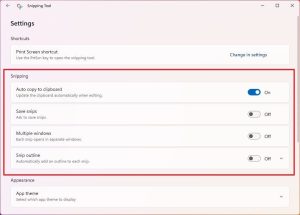
5. Auto clipboard copy – Saves the capture to the clipboard for convenient copying into documents.
- Save snips by using Snipping Tool — Requests that the capture is saved as you close the editor.
- Multiple windows: For each capture, a new program instance is launched.
- Snip outline: Automatically adds boundaries to each snip while using Snipping Tool.
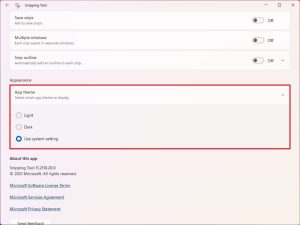
- Select the App theme setting from the “Appearance” section.

6. Choose a color scheme. Options include:
- Light.
- Dark.
- Use the system settings.
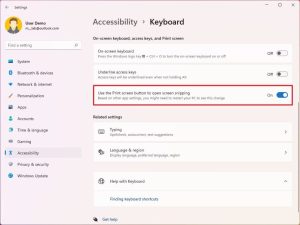
7. Click the Change in settings option for the Print Screen shortcut setting under the “Shortcuts” section.
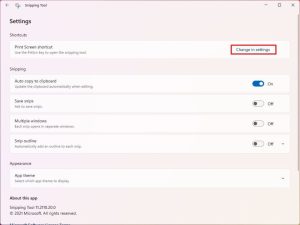
8.Select the Yes option.
9. Use the Print Screen button to open the screen snipping toggle switch to access the tool using the Print Screen button rather than the Windows key + Shift + S shortcut.
- When you finish the steps, the settings will be applied immediately.
FAQ
On a Mac, how can I utilize the snipping tool?
ALSo SEE: Bluetooth Toggle Missing Windows 10
Macs can also capture screenshots, albeit the term “snipping tool” is not used. Press Command + Shift + 3 to snap a complete screenshot. To capture a piece of the screen, press Command + Shift + 4, then move the cursor to include the section you want. To capture a specific Windows or screen recording, use Command + Shift + 4.
On a Chromebook, how can I utilize the snipping tool?
ALSo SEE: Windows 10 Shuts Down Without Warning
ChromeOS also has its screenshot software, Screen Capture. Choose it from the Quick Settings menu. Alternatively, for a full screen, press Ctrl + Window Shift or Shift + Ctrl + Window Shift for a partial mesh.